
last update 1.24.2024
Perhaps you’ve booked your trip already or you are considering climbing Kilimanjaro, either way, you’ve come to the right place. We’ve got everything you need to know about your upcoming climb. From fitness to gear & kit, handy hints & tips, and important information about trekking at altitude.
Preparing for your big adventure should be fun! After all, it’s the journey, right? Your journey begins long before you arrive at the gate to Kilimanjaro National Park. It starts with you deciding to climb Africa’s highest peak.
It continues through your preparation before you arrive in Tanzania. Then your days on the mountain, living what you have prepared for, culminating in a successful summit and the feeling of having achieved something epic!
We also have 19 Mount Kilimanjaro Facts to know before you plan your adventure.
Table of contents
- Choosing a Tour Operator
- Travel Insurance for Climbing Kilimanjaro
- Kilimanjaro Routes: which one to take?
- Crater Camp: Africa’s Highest Camp!
- Kilimanjaro Ash Pit: the Center of the Volcano
- Gear and Kit List
- Fitness & Physical Preparation
- Altitude & Acclimatization
- Weather
- What to Expect
- Conclusion
- Frequently Asked Questions
- Need More Advice on Gear and Footwear?
Choosing a Tour Operator
So you woke up one morning, stretched, and had the mad idea of climbing Kilimanjaro. Yep, that happened to me too.
Actually, I was in a tent in Amboseli National Park in Kenya, and I had my morning tea overlooking Kilimanjaro when I thought I’d like to climb that.
Showing my age, back then I couldn’t jump on to Google to find out everything I needed to know about Kilimanjaro tour operators.
Nowadays we have information overload and far too many choices. With so many companies offering Kilimanjaro tours, it can be hard to select the right one.
Once you’ve established the basics:
- Does it require technical skills that I don’t have? No. No technical skill is required.
- Am I fit enough, or can I get fit enough to climb Kilimanjaro? Yes, if you have no medical problems or common injuries that might prevent it.
- Who do I book with? Well. This is the question I won’t be answering. Why not? Because choosing a tour operator requires due diligence on the part of the potential climber.
I will provide you with some insight into the questions you need to ask and answer. This will help you determine which operator would be the right fit for you.
“Can’t you just tell me who to climb with?” No. Because if I did, you can be quite sure that the company in question is paying me to do so. I prefer to stay impartial.
Who I choose may not be who you choose.
Unless you are a frequent climber of high-altitude peaks, climbing Kilimanjaro will possibly be a once-in-a-lifetime adventure.
How Do I Choose a Tour Operator?

To climb Kilimanjaro, you have to go with a KINAPA-registered company – you cannot climb alone.
There are numerous to choose from, ranging from high-end to budget operators. From cowboy outfitters to climbing veterans.
You can choose to join a group, get your own group together, or go on your own.
You need to decide which operator is best for your experience level, your budget, and your safety. Adequate research before signing up is important so that you know you are in safe hands.
Unlike booking a restaurant, you cannot simply read a few reviews and then hand over your cash.
You are undertaking a big and potentially dangerous adventure in a far-off land, and you want to be sure of your safety.
Every year, new cowboy outfitters spring up in the Tanzanian towns of Arusha and Moshi offering Kilimanjaro tours, quite cheaply.
Cheap operators can be expensive when it comes to your comfort and safety.
If you habitually spend your spare time bungee jumping in remote locations, then your concept of “safety” may be different from an office manager with a wife and two children at a private school.
Safety on Kilimanjaro

Probably the most important consideration when climbing Kilimanjaro is the safety protocols the operator employs.
- Are the guides trained in first aid – at the very least – or preferably Mountain Responders?
- Do they conduct regular health checks for the climbers (lung sounds, oxygen saturation in the blood, questions about how you are feeling)?
- And more importantly, do they know how to interpret the results? Daily health checks of each client – in my opinion – are an important way to identify Altitude Sickness before it becomes a problem.
Guide training is very important. Have the guides had any training over and above what the National Park requires for registration?
The training needed by the Kilimanjaro National Park to license a guide is fairly basic. Most reputable operators will provide more comprehensive training in safety and first aid protocols.
Evacuation Protocols
- Do they carry supplementary oxygen and a Portable Altitude chamber? These are not mandatory but can provide peace of mind to climbers.
- What happens if you get injured and cannot continue the climb? Will you go down the mountain with a guide or a porter, who is responsible for getting you to the hospital?
Having a robust set of protocols for dealing with emergencies is essential. The top of the mountain lacks helicopters.
Does the operator ask you questions about your health before taking your money? Or do you just sign a disclaimer and hit the trail?
Any tour operator worth their salt will have you fill out a comprehensive medical form so that they are aware of any prior medical issues that could affect your climb.
Questions to ask any company offering Kilimanjaro tours:
- What medical training have the guides had?
- What day-to-day medical checks (if any) are performed?
- Do they carry supplemental Oxygen or Portable Altitude Chamber*.
- What is the evacuation protocol in the event of illness or injury?
- Do they carry a comprehensive first aid kit ” and more importantly, know how to use it”
Your Climbing Budget
The first thing you will notice when researching operators is the huge variance in price.
Why is this? The tour operator has numerous expenses involved in taking a client up the mountain:
- Park fees per climber
- Equipment
- Safety equipment
- Guide’s salaries & equipment
- Porter’s salaries & equipment
- Food and drink
- Length of the climb
It didn’t take Einstein to figure out that going with a cheap operator would mean they have to make savings in one or other of these areas.
If the equipment is old and falling apart, you may find yourself sleeping in a leaky tent. If the sleeping bags are from circa 1978 and have not been washed since 1991 then it’s going to be a bit smelly.
Staff Welfare

A porter’s life on the mountain is a tough one. He carries your gear and his own. Others carry the cooking facilities and the tents and everything else that the camp requires.
Some operators have their porters ill-equipped to deal with the cold and the terrain. Others pay them as little as $1 a day, and they hope for tips at the end of the climb.
Porter welfare poses a significant concern on Kilimanjaro, and I strongly encourage all climbers to ensure that their operator is registered with the Kilimanjaro Porters Assistance Project (KPAP)..
Every year, porters die, although the Western press mostly only reports the death of tourists on Kilimanjaro.
Food and drink
Another place where budget operators can make savings is by skimping on their food purchases. You should expect to get three hot meals a day on most days, depending on your itinerary.
There is no reason to subsist on sandwiches, freeze-dried backpacking food, and the odd boiled egg.
Do you filter and purify your water every day for your tea, coffee, and hot chocolate, and when refilling your hydration bladder? Neglecting this important step could lead to a nasty case of gastric trouble, potentially cutting your climb short.
Climbing Kilimanjaro is not cheap, and you should have an idea of your budget – if it’s too small to hire a reputable operator, perhaps try a different adventure this time.
Local or Overseas operators
That’s not to say that the most expensive is necessarily the best.
Always ask whether the agent in the US or UK/Europe runs their own climbs or outsources them. If they outsource the climb, then find out who they are outsourcing it to…
…Then do your research on the local operator and consider cutting out the middleman.
Some overseas operators run their own climbs on the mountain. Sometimes they will send an overseas guide which drives the price up. Some clients feel more secure having someone from their own country running the climb.
The length of the climb will also determine the price. If you want a short climb, with a low success rate (not enough time to acclimatize), then it will be cheaper.
You should be very sure of your ability to acclimatize if you choose a short route. Obviously, the more time spent on the mountain, the more you’ll pay.
If it’s too cheap, you’ve got to ask yourself why.
What compromises are being made? Are they compromises you can live with in terms of your own safety and your conscience is happy to accept?
Figure out your budget, and go from there. Even if money is no object, you still need to do your research!
Client Success
Any operator claiming to have a 100% success rate with all their clients is most probably lying. There will inevitably be situations where a climber is unable to make the summit, perhaps from asthma, fatigue, mountain sickness or injury.
If any operator claims a 100% success rate, they are either very new on the mountain or being economical with the truth.
Notably, the routes with the highest success rates are the longer ones, Lemosho, Machame, and Northern Circuits.
Many of the higher-end operators will not use the shortest, Marangu route, as it is not particularly scenic, it’s very busy with budget operators and has a very poor acclimatization protocol.
Equipment

Although we touched on this above, it is worth elaborating on. The equipment used for your climb is very important to your comfort and safety.
You won’t be very happy in an ancient tent that leaks. Gear takes quite a battering on the mountain, and it isn’t just used for your climb.
You want an operator who regularly checks and updates their equipment. Complaints about tiny, leaking tents from budget operators are commonplace. Is the tent going to be big enough for the two of you – and your kit?
You don’t want to be storing your bags outside in the rain and cold. Most reputable operators use high-quality 4-season, three-man tents, for each two-person sharing.
Do they provide a mess tent for meal times? It may seem unimportant that you eat your meals as an outdoor picnic, but as you climb higher and it gets colder, this gets less appealing.
And what if it is raining? Sitting in your tent trying not to spill soup all over your down sleeping bag is not a pleasant way to dine on the mountain.
If you are renting gear, is the gear of good quality, or is it simply gear that previous climbers have donated?
You may feel like saving money and not buying that expensive down jacket, and you can rent one. If it’s some old cheap thing that hasn’t been cleaned in ten years, you’ll soon regret that decision.
Public or Private toilets
Some operators give their clients private toilet tents with a chemical toilet.
This is a matter of personal preference. The public toilets at the camps are not a pretty place to be. They are the “long drop” variety, do not flush and the smell can turn the strongest of stomachs.
But the provision of a private toilet is another expense. Most of the high-end operators provide this as standard. It’s up to you to decide how important it is for you.
Financial Protection
Don’t assume that you will be protected if the operator goes out of business.
One of the reasons why many people like to book with an overseas operator is that they will most likely be ABTA and ATOL-protected.
It’s very important that you have adequate travel insurance for climbing Kilimanjaro.
Sending your money by Western Union transfer and risking the possibility of the operator going bust and losing your money is the last thing you want to do.
Too many stories abound of operators who take money, then suddenly at the last minute, there are a lot of “extras” to pay.
Disreputable operators have charged clients for an 8-day trip, only for them to discover that it was actually a 7-day trip, with the extra money mysteriously vanishing.
Choosing an operator is not as simple as who is the “best”. It is who is the best for you.
Everyone has different standards and expectations. However, keep in mind that getting to the summit is the goal, but getting down alive is non-negotiable.
Look for an agent whose ethos matches your own. Whom you feel comfortable with.
Climbing Kilimanjaro is not cheap. Expecting luxury at a budget price is not going to happen. Do your research and ask lots of questions!
Travel Insurance for Climbing Kilimanjaro
High on the list of “boring things to do” is arranging travel insurance for climbing Kilimanjaro.
Yet another thing to tick off your list – and pay for.
It can seem never-ending when preparing for Kilimanjaro. But travel insurance needs to be high on your list of priorities. Most decent tour operators will insist that you have it.
You can get a quote from World Nomads, who we know offer suitable policies.
Get a quote here, now:
Once you’ve got your basic quote, you’ll need to upgrade it to cover high-altitude trekking up to 6,000 meters for Kilimanjaro.
For those who are wondering whether they need to part with more money, here is some more information on travel insurance for climbing Kilimanjaro:
What’s the point of travel insurance?
Travel insurance is designed to cover you (subject to the conditions of the policy) for costs incurred should the unexpected happen whilst you are abroad. You hope you’ll never need it. It can seem like a “waste of money” until something happens.
Why?
- Climbing Kilimanjaro can be dangerous! Any mishap on the mountain requiring medical attention or evacuation will need to be paid for from somewhere.
- You’ve spent a heap of money on this trip, what happens if your mom gets sick before you go and you need to cancel the trip? Or if you injure yourself a week before you are flying to Tanzania? The tour operator won’t give you your money back at short notice? but travel insurance should have you covered.
- What if your bags are lost en route to Tanzania? Who is going to pay for all that expensive kit you’ve just bought?
- What if you come down with a stomach bug on your first day and have to cancel your climb?
- What if a family member back home gets sick and you need to cut short your adventure?
- What if you get malaria on your post-climb safari?
These are just a few of the reasons why it might be a good idea to get some travel insurance for climbing Kilimanjaro.
But, you say….
“I’ve got health insurance, surely I don’t need travel insurance?“
You might. I doubt that your health insurance would pay out for canceled flights and your climb booking if you were to get sick at the last minute! Nor will your health insurance cover you for emergency evacuation, should it be necessary.
“I’ve seen so many online reviews of people having difficulty claiming on travel insurance policies.”
I’m sure you have. And those people didn’t read the small print. They weren’t covered for what they assumed.
Travel Insurance for Climbing Kilimanjaro Considerations
Always read the small print. Yes! I said it. We have become accustomed to not reading “the small print” because it’s boring. It won’t be so boring if you accidentally purchase a policy designed for sitting on the beach when you intend to climb a very high mountain!
When you are buying travel insurance for your trip to Kilimanjaro, it’s important to check that the policy you select covers you over 6,000m. It needs to provide for the activity that you are undertaking. Which is high-altitude trekking.
We like World Nomads because they seem to understand that not every vacation involves sitting around doing nothing!
Visit World Nomads to get a quote for your Kilimanjaro travel insurance now.
Kilimanjaro Routes: which one to take?
You’ll also need to decide what route you want to take up the mountain.
There are 7 routes on Kilimanjaro, and not all of these are created equal. In terms of acclimatization, longer routes have a much better success rate.
Other considerations are: how busy the route is, how scenic it is, and whether you sleep in a tent or in huts. Whether you take the Western Breach or the Barranco Wall. Do you want a day or nighttime summit attempt?
Marangu Route
The Marangu route is the cheapest route on Kilimanjaro. It is the oldest route to the Summit and the only one where you sleep in huts instead of tents. Marangu uses the same route on the descent, so during busy periods, it can get quite crowded.
If you are on a budget, consider the Marangu route as an option. Many people are led to believe that it is an “easy” route, as it only takes 5 days (you can choose to extend it to 6 days for an additional acclimatization day).
The idea of a 5-day hike seems a lot easier than an 8-10 day hike. But that doesn’t take into account the effects of altitude.
One of the reasons why the summit success rate on the Marangu route is only around 45% is that there is not enough time for acclimatization. For climbers confident in their ability to acclimatize and wanting a shorter hike to the summit, this is worth considering.
Those who are less experienced at altitude and want a less crowded, more scenic adventure, and who are not on a tight budget, should opt for one of the longer routes.
The longer routes have a much better acclimatization schedule and as such a better chance of achieving summit success.
Marangu utilizes huts for accommodation, which reduces the number of required porters per climber as there is no need to carry a full camp up the mountain. This, in turn, lowers the overall cost.
For the Summit attempt, climbers exclusively ascend from Kibo Hut (referred to as the “basecamp”) at night, with no alternative for a daytime climb.
Personally, I prefer to leave camp in the morning for the summit attempt and not try to hike above 15,000ft in the middle of the night!
That the Marangu route provides accommodation in huts, might sound preferable to sleeping in a tent. Do bear in mind that the huts sleep 6-10 people in dormitory-style bunk beds. It’s not a luxury safari camp with crisp linen and hot running water!
Machame Route
If you cannot afford the high-priced Lemosho route, then this is a very good option. Some say it’s more “difficult” than the Marangu route, simply because the hiking days are longer. But the summit’s success is much higher, owing to the extra acclimatization.
In recent years, the Machame route has gained in popularity, and more climbers use this route than the Marangu route.
The Machame route has a much better acclimatization schedule and has a much higher success rate than Marangu. As it has become more competitive, it has also become cheaper.
The scenery is spectacular. The vistas and views will take your breath away. The hiking can be tough with relatively long days, but you will gain a lot in terms of acclimatization.
Lack of good acclimatization is the main reason most trekkers do not make the summit. On the Machame route, you can take a 6 or 7 day option, the extra day can be valuable for your acclimatization.
You will sleep in tents, there is no hut accommodation on this route which means you will need to choose your operator carefully. The last thing you want at the end of a day’s hiking is an old and leaky tent!
This route usually involves leaving at midnight to make your summit attempt from Barafu Camp. Those who do not like the idea of walking after dark might want to consider the Lemosho Route.
Many of the operators who use Lemosho, provide an option for leaving for the summit first thing in the morning. If this is an important factor, it’s worth asking your chosen operator if you can use the Machame route in conjunction with a daytime summit push.
It’s also possible to scale the Western Breach to the summit from Arrow Glacier Camp.
Merging with the Lemosho and Shira routes near the Lava Tower, Machame takes you up the Barranco Wall, which contrary to many scaremongering articles, is a tough, but not at all technical scramble.
The Machame route uses a different route on the descent, which keeps the trails less busy than the Marangu which uses the same route to descend as to ascend.
Lemosho Route
There are a few different variations to the Lemosho Route, so check with your chosen operator which one they are using. Some spend two nights in the Shira Caldera at Shira Camp 1 and Shira Camp 2. Others go directly from Shira 1 to Barranco Camp. Some go from Shira 1 to Moir Camp and then onto Barranco Camp.
In my opinion, the Lemosho Route is the best route on Kilimanjaro. Two of my climbs have been on this route, for good reason! It’s a longer route, allowing for better acclimatization and giving a higher probability of summit success(1).
It takes you through the most beautiful and scenic parts of the mountain and is not as busy as some of the other ” cheaper ” routes.
This route is not offered by the budget operators, so it keeps foot traffic lower but there is less competitiveness in the pricing. If you are not strapped for cash and want an amazing experience on the mountain, the Lemosho route should definitely be a strong contender.
The forests to the west side of the mountain ” where the Lemosho route begins ” are undoubtedly the most beautiful and pristine, it’s possible to see evidence of game here.
Although you are unlikely to spot any animals, only a few years ago, trekkers were accompanied by armed rangers in case of close encounters!
The terrain is much less well-trodden than the Machame/Marangu routes, and the days can be long. The huge bonus is that the length of the trek allows very comprehensive acclimatization.
In mountaineering, acclimatization truly determines whether one reaches the summit or not. If you possess the necessary fitness level to undertake the challenge of climbing Kilimanjaro, it is acclimatization that stands as the primary factor separating triumph from disappointment.
The Lemosho route gives you the opportunity to acclimatize properly before your final push to the Summit. There are two possible summit routes to take: the usual one, via Barafu Camp, or the more dangerous and seldom-offered Western Breach.
For this, I will assume you are taking the Barafu route. Some operators will offer a morning hike to the summit, while others, you start at midnight and arrive at the crater rim at dawn.
Northern Circuits Route
Taking advantage of the untrodden paths, the Northern Circuits (sometimes called “Kili 360”) route is one of the latest offerings on Kilimanjaro. This route takes you through some spectacular scenery, through largely untouched parts of the mountain.
Being a longer trek, the acclimatization schedule is good, giving you an excellent chance of reaching the summit. Taking in the best of Kilimanjaro and avoiding the crowds, this route is worthy of consideration.
It’s more expensive than the more popular routes, owing to less competition from budget operators, but worth it if a more tranquil and “wilderness” trek is what you are looking for.
All accommodation is in tents, there is no Hut accommodation on this route.
Beginning on the same path as the Lemosho route, the forests to the west side of the mountain are undoubtedly the most beautiful and pristine, it’s possible to see evidence of game here.
Although you are unlikely to spot any animals, only a few years ago, trekkers were accompanied by armed rangers in case of close encounters!
The terrain is much less well-trodden than the Machame/Marangu routes, and the days can be long. The huge bonus is that the length of the trek allows very comprehensive acclimatization.
And really, acclimatization is the difference between making it to the summit or not. If you are fit enough to attempt Kilimanjaro at all, then acclimatization is the main barrier between success and failure.
Rongai Route
The Rongai route used to be the route to take if you wanted a quieter experience than the longer-standing and popular Marangu and Machame routes. These days, it is used by more and more operators so it’s getting busier, and the price is coming down. But don’t let that put you off.
Starting on the Northern side of the mountain, the Rongai route is often said to be a fairly “easy” route to the summit.
There are fewer steep hiking days, which some may see as an advantage, but then the summit push on the last day can seem even worse! In this area, rainfall is generally lower, allowing for the avoidance of muddy trails through the rainforest on some of the other routes.
This route starts in open, part-cultivated countryside, rather than the Montagne forest of the southern and western slopes. Most operators offer 5-8 day hikes on this route.
To ensure proper acclimatization, it is important to avoid the temptation of doing a short trek. The additional days are crucial for allowing your body to adjust to higher altitudes. Unlike the longer routes, the more gradual slopes on this trek offer limited opportunities for ascending to higher altitudes and then descending to camp.
That said, the Rongai route has excellent summit success rates and is an interesting and picturesque way to the summit. Although you do not get to hike through the rainforest on the way up, you will be descending via the Marangu route, so at least you will see it on the way down.
The vegetation is somewhat different on this route, though most of the usual heath and moorland species abound, particularly if you do take the longer route and camp at Mawenzi Tarn. The lobellias, senecios and red hot poker are all there.
Depending on your operator, there may be some differences in where you camp. Some stop at Simba Camp for the first night, and others go to Rongai First Cave.
Either way, there is little difference in terms of difficulty or the length of hiking each day.
The hike to the summit is done at night – starting at midnight from either Kibo Hut (which follows the same as the Marangu route) or School Hut which is located slightly higher up the mountain.
Umbwe Route
If you’ve got those legs of steel, are confident of your ability to acclimatize, and want a route with dramatic scenery and a real physical challenge ” go for it!
Hailed as the most difficult route up the mountain ” and when coupled with the Western Breach summit attempt “The Umbwe route is certainly the most “straight up.
Nothing about this route is technical, but it’s very steep, in the first couple of days you will find yourself using tree roots to help haul yourself up the mountain!
Strong legs and the love of a challenge are essential. Owing to its difficulty you will often have the mountainside to yourself for the first two days, as most normal people are making their way up less physically demanding routes.
Later on Day 2, however, it changes as you will be at Barranco Camp with other climbers from the Lemosho route and Machame route.
From Barranco, you will either take the Southern Circuit to the Summit via Barafu Camp (with Lemosho and Machame climbers) or you will head north to Lava Tower and onto Arrow Glacier from which to tackle the Western Breach.
The Umbwe route, coupled with the Western Breach is certainly the most challenging and direct way to the Summit.
This route is definitely suitable for physically fit and experienced mountaineers who are seeking to enhance the challenge of conquering Kilimanjaro.
If you are not going up the Western Breach, then I see no particular advantage to giving yourself the two unnecessarily tough days in the beginning, only to go onto the same route as the Lemosho and Machame.
However, it’s spectacular. As you haul out of the forest on Day 2, you will traverse a ridge with the most incredible views of Kilimanjaro. You are unlikely to see many ” if any ” other people on the first and second days hiking.
Operators offer the 5, 6, or 7-day option as a route. Unless you have already acclimatized well (from Mt Meru) or you are extremely confident in your acclimatization and possess significant mountain experience, it is advisable to avoid considering the 5 or 6-day route.
Go with the 7-day trek, you will still have the physical challenge but with a better chance of acclimatizing properly.
As I have mentioned previously, and will continue to emphasize, if you possess the fitness level necessary to contemplate climbing Kilimanjaro, the primary barrier standing in your way of reaching the summit is acclimatization.
Shira Route
Let me save you some time: The Shira Route is the same as the Lemosho route but starts at a higher elevation. Consider it if you are already acclimatized after climbing Mt Meru or Mt Kenya. If not, then read about the Lemosho Route instead!
Is the “Shira Route” even available anymore? If your operator is offering you this route, do read on before clicking the “buy now” button.
The Shira route was the original path on the western side of the mountain prior to the availability of the Lemosho route. It started at Shira Gate, before the opening of Londorossi Gate. With a starting altitude of 3,600m, participants were transported to the starting point via a 4WD vehicle along what is currently utilized as the “rescue road.”
Starting your trek on the Shira Plateau, you miss the wonderful hike through the montane forest. Which on this side of the mountain is nothing short of spectacular.
Starting at the Shira Gate, you essentially follow the emergency road across the plateau to your first campsite. This takes you through the scrubby heath and moorland zone.
Apart from the first day, this route is exactly the same as Lemosho. Your first campsite will effectively be the same as your second campsite if you take the Lemosho route. You simply miss the first day’s hike and start higher up. I can’t see much advantage in this.
A major problem with this route is that its start point is around 3,600m. This is too high an altitude for all but the most experienced altitude trekkers. If you are well acclimatized – perhaps by climbing Mt Meru first – then you could consider using this route as it’s shorter than Lemosho.
But for the rest of us who want to acclimatize and not feel sick on the first day, I don’t recommend it. Most operators now offer the Lemosho route in place of this one.
Assuming you are fit enough to even attempt to climb Kilimanjaro, acclimatization is the biggest obstacle to a successful summit(1).
Every year, fitter, stronger people fail to reach the summit due to poor acclimatization. On the other hand, less fit, less strong people who are well-acclimatized are often successful.
Essentially by cutting out the first day’s hiking through the rainforest, you lose valuable acclimatization time, reducing your likelihood of reaching the summit.
But you also miss the experience of the rainforest. Part of the fascination of climbing Kilimanjaro is seeing the different climate zones and how they differ from one another.
Mostly this route is not offered anymore, possibly some operators will offer it by request. Those that advertise the “Shira Route”, often actually start at Londorossi gate and follow the Lemosho route.
Shira Route? As they say in New Zealand: Yeah-nah, don’t bother.
The Notorious Western Breach
Kilimanjaro’s Western Breach is notorious for being the most dangerous and difficult route to the summit.
The Western Breach actually describes the last part of your climb. Once you are at the bottom of the crater rim, at your “base camp” there are three main routes that take you to the top:
- From Kibo Huts in the East, up to Gillman’s point on the crater rim.
- From Barafu Camp in the South East to Stella Point on the crater rim
- Via the Western Breach, from Arrow Glacier camp to an opening in the crater wall, straight into the crater. Strangely enough, this is located on the West side of the mountain.
The Western Breach is described by many as “the most difficult route”, “the most dangerous”, “too technical for most people”, “need mountaineering experience”. Enough to strike fear in the hearts of all but the most hardened climbers.
It’s tough. All routes to the summit are tough. Anyone who skips down the mountain proclaiming it to be “easy”, is either telling huge porky pies (lies) or spends most of their vacations high up in the Himalayas, doing more trekking than beer-drinking.
What are the advantages of the Western Breach:
- It’s shorter than the routes via Gillman’s Point and Stella Point
- It’s less crowded
- You don’t have to go down it(!)
- It makes you feel you are doing something a bit “above and beyond” the usual Kilimanjaro climb
- It’s easier. BUT.
WHAT? That last point? It’s certainly NOT easier if you read most of the literature!
So let me qualify that statement.
It’s easier than the other two routes IF:
- You are extremely well acclimatized
- The training you did before you arrived at Kilimanjaro gave you legs of iron.
- You don’t suffer from vertigo.
- You have a healthy respect for what you are about to attempt, and you are aware of the very real danger of rock fall.
- You have an excellent guide who knows the route – which is not one single route, and not a well-cut path.
- You have availed yourself of all available literature regarding the elevated risk you are taking by using this route.
If – and only if – the above points apply to you, then it is in fact easier. It’s much shorter, so you spend 4 hours climbing instead of the long 7-8 hour slog through the scree. The endless switchbacks can be tedious, but the views are amazing (if you can stomach the exposure).
Did I mention legs of steel? It’s very steep, so if you have spent a lot of your training making sure you’ve got thighs that would make Serena Williams proud, this route might be considered.
It’s an extremely steep rock face, very much the “straight up” route. Once you get beyond a certain point, evacuation is impossible – in order to go down, you have to go up and through the crater over to the other side.
What are the disadvantages?
- Very tiring, hard hike on a very steep rock face.
- You may need to wear a helmet and be roped in with your other climbers/guide
Crater Camp: Africa’s Highest Camp!
18,700 ft, 5700 metres. The highest camp on Kilimanjaro. The highest camp in Africa. A camp situated in what is commonly called the “extreme altitude” zone. A camp that is one of the most beautiful and spectacular ” and dangerous ” that most people will ever see.
Amongst the black volcanic rocks tower enormous glaciers, ever moving, ever retreating, glistening in the sunshine. The sound of huge cracks as a massive wall of ice adjusts its position ever so slightly.
The chances are, you’ll see no one else here. Nothing growing, no animal life. The thin mountain air and sub-zero temperatures are inhospitable to life of any sort.
To get here, you have to scale the highest mountain in Africa, and then descend from its rim into the crater, at the center. As you explore an area as familiar as walking on the moon, sometimes a faint whiff of sulphur can be detected, as the central Ash Pit belches out its gases.
A reminder that Kilimanjaro is a dormant volcano.
Standing above the clouds, looking down on the world, all the comforts of home stripped away, most problems seem trivial. Up here it’s about survival. Staying warm, adapting to the altitude, and enjoying the majesty of this great mountain.
Camping in the Crater

A night at Crater Camp is something you will remember for the rest of your life. Hopefully for all the right reasons. It’s tough here. As the sun sets, it’s a stark reminder that we are sleeping only meters from a huge freezing glacier.
With only a tent, our clothes, and a sleeping bag as protection. An emergency up here can lead to tragedy. With the rocks of the crater rim towering above us, we feel very small. Very insignificant. But very alive.
I felt almost “high” from the effects of hypoxia, taking in this incredible scenery. Exploring the glaciers, walking on the crisp volcanic earth, and watching the sunset over the Western Breach.
Sleeping in Crater Camp, an offering not made by most operators on Kilimanjaro requires that you are very well acclimatized. This won’t happen on the shorter routes. For climbers showing the effects of altitude sickness on the ascent to the summit, sleeping at this height can be catastrophic.
Headaches and nausea are standard procedures for your night in this camp. Sleeping is tricky, jolting awake from the lack of available oxygen for normal breathing.
It’s exhilarating. It’s not for the faint of heart. And it’s not for anyone who feels unwell at the crater rim.
Ash Pit
Try to visit the the Ash Pit, a perfectly formed volcanic cone. If you can stomach the smell of rotten eggs. Fumaroles blow out malodorous fumes from the center of the mountain, standing atop, looking down into the now dormant, volcano.
How do I get there?
Crater Camp can be accessed either by scaling the Western Breach or hiking from Barafu Camp to Stella Point. If coming from the Western Breach, I would recommend making the extra hike to the Summit before sleeping in the crater, rather than leaving it until the following morning.
The few extra meters up to the summit can help with the “walk high, sleep low” acclimatization protocol. It also means that the summit has been scaled and early the next morning, descent is all that’s needed.
Coming from Barafu, most trekkers do a daytime push to the summit, arriving after lunch, before spending the night in Crater Camp Kilimanjaro. For me, spending a night in the Crater was more important than the summit (well, not quite, but almost).
Acclimatization is Key

A good operator? even if a night in the crater is scheduled in the itinerary – will check each climber’s condition at the Summit before making a final decision as to who will sleep there.
Many climbers who reach the Summit decide they do not want to take the risk of sleeping so high.
Evacuation from the crater is very difficult. It’s approximately a mile trek to get back to Stella Point, up the crater rim. There are no helicopters here. You should be given the option to descend back to Barafu after a successful Summit.
Unless you’ve come to the Western Breach. Some extremely hardy people have been able to scale the Western Breach, reach the summit, and descend to Barafu camp in one day. And if you are strong (mad!) enough to do that, you are probably strong enough to sleep in the crater!
Don’t be fooled that it’s just clients that can get into trouble up here. On my last trek, out of the 14 climbers in our group, only two of us slept in the Crater. That night, one of our porters got very ill and had to descend immediately.
It’s imperative to have a guide who is well-versed in high-altitude first response. Who knows how to treat an emergency? A Portable Altitude Chamber (gamow bag), as well as oxygen canisters, are highly recommended.
Your Guide
In 2005, a friend and I climbed the Western Breach. Having been perfectly well acclimatized at Arrow Glacier camp, my friend became very ill about 200m from the crater rim. Vomiting, diarrhea, extreme nausea and headache.
Thankfully, (since there is no way down, from that point) we had a very experienced and well-educated guide. He was qualified to treat her symptoms and she spent the night in the Crater safely. He monitored her condition carefully overnight.
It is imperative that you have a guide whom you can trust. A guide who is educated in high altitude first-response.
So, if you are not scared off already (you shouldn’t be ” it’s an amazing experience!), how do you go about sleeping in the crater” Firstly, find an operator who offers it – and make sure they have exceptional guides.
Then take the longest route you possibly can up the mountain. This allows adequate time for acclimatization. It’s expensive to sleep in the crater, so don’t try to save pennies by thinking you’ll be all right on a shorter route. If there’s an extra acclimatization day up for grabs, take it!
It’s likely you will have the crater all to yourself. You, and your little camp. It’s a real mountain wilderness experience at a very high altitude!
Best Routes for a Night at Crater Camp
The longest route possible! Typically, it is the Lemosho Route that climbers use, which has a good acclimatization schedule. For the very “tough”, try the Umbwe Route, but add extra days. Some operators on the Machame Route will offer a night at Crater.
Kilimanjaro Ash Pit: the Center of the Volcano
What happens at the top of the mountain? Are you camping in the Crater, or taking a hike to the Ash Pit?
Most people who think about climbing Kilimanjaro, think about getting to the Summit, seeing the Uhuru Peak signpost for themselves, and taking photographs. However, there is so much more to the top of this mountain than just Uhuru Peak. The Kilimanjaro Ash Pit is the very center of the volcanic cone.
Uhuru Peak sits at the highest point of the crater rim, below this is the crater. Filled with glaciers and volcanic rock, it is possible to camp on the crater floor if you are very well acclimatized.
Exploring the glaciers up close is an amazing experience, feeling the cold, hard ice under the blue skies and equatorial sun. Whilst inside the crater, a place where few people go is to the Ash Pit: the very center of the volcano.
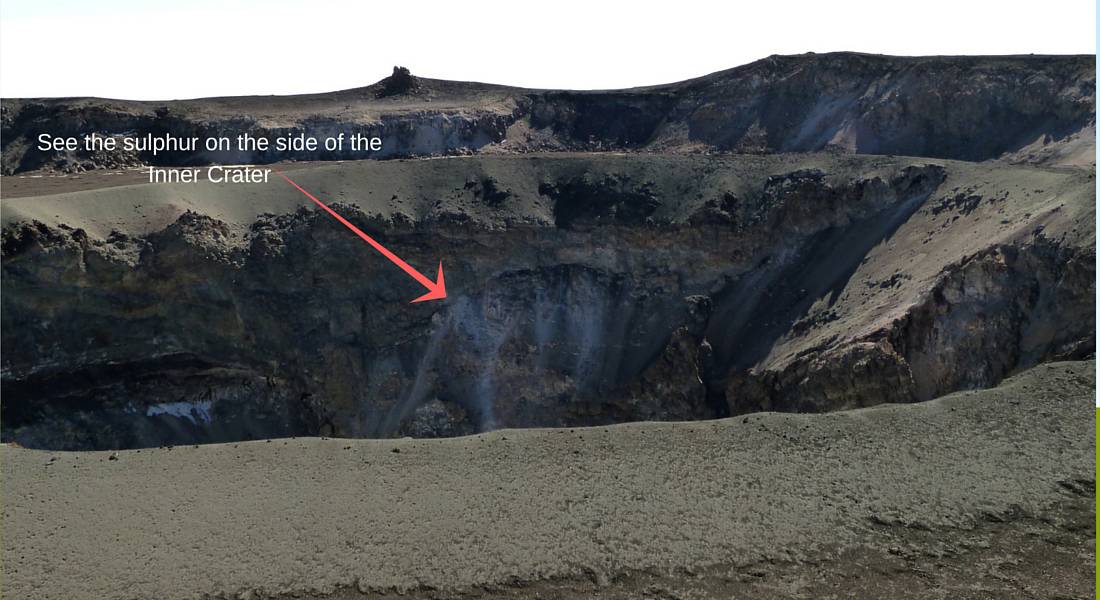
Fumaroles belching forth their sulfurous gases, the raw sulfur on the sides, and the perfectly formed cone reaching down into the depths of the earth. This is where it all came from.
Whilst standing at the summit is an astonishing achievement, for me, it doesn’t really stop there. What is this place, apart from just being the “highest mountain in Africa” and the “highest free-standing mountain in the world”?
Sure, there are more dramatic “volcano experiences” in the world, watching active volcanos in Costa Rica, for instance. But once you are on the top of Kilimanjaro, in this inhospitable land of ice, rocks, and thin mountain air, seeing the Ash Pit is an opportunity not to be missed.
The second time I climbed Kilimanjaro, I did it so that I could see the Ash Pit. Sure, the summit was great fun and I enjoyed snapping further pictures of my (slightly older) self there. But my mission was to see what lies atop this mountain.
What is the Kilimanjaro Ash Pit?
Kilimanjaro consists of three volcanic peaks. Shira (3962m), Mawenzi (5149m) and Kibo (5895m). Kibo is the youngest of these three peaks, its most recent activity being in the Pleistocene era.
What remains of both Shira and Mawenzi have been partially covered by volcanic material from Kibo. Only on Kibo can you see the concentric craters still intact.
At the top of Kibo is the Kibo Crater, the main crater you see from the summit and aerial photos. Within the Kibo Crater there is the Reusch Crater, and within this lies the Ash Pit. These three are all visible from the summit on a clear day.
All three are concentric craters, and the Ash Pit forms a perfect circle. The closer you get to the Ash Pit, the stronger the “rotten eggs” smell of sulfur is. Which is not great if you are already feeling a bit nauseous from the altitude!
The Ash Pit is 395ft wide and is composed of shale and large boulders that have rolled down. Fumaroles, vents that emit sulfur and steam are found at the base of the Ash Pit, and it’s estimated that the temperature of these vents is that of boiling water.
The Reusch crater was named after a missionary who famously found a leopard frozen in the snow and cut of its ear as a souvenir. This leopard was the inspiration for the opening lines of Hemingway’s book The Snows of Kilimanjaro.
So why doesn’t everyone see the Ash Pit?
From the Crater floor, you have to climb up this steep slope to get there!
Normally, visiting the Ash Pit requires a night to be spent in Crater Camp. And you’ll only be able to do that if you are well enough acclimatized to sleep at over 18,000 feet. And your operator will have had to make the logistical arrangements for you to do so.
This can be costly, and it’s dangerous to sleep up there. Mostly it’s the high-end operators that offer it, on a longer trek to ensure good acclimatization.
Sometimes an operator will take you to the Ash Pit after you’ve reached the summit before heading back down the mountain. Obviously, this would only be possible if you were feeling fit, strong, and well-acclimatized.
If you are looking for something a bit more than just getting to the top, then I highly recommend a night in the Crater and a visit to the Ash Pit.
Walking from Crater Camp, it will take about 30-40 minutes to get to the Ash Pit. You hike across the crater floor, past the glaciers, and up the ridge of the Reusch Crater. Once you get there, don’t lean over too far, if you fall down this, you won’t be getting out again!
Gear and Kit List
You will also need a particular gear ” or “kit. Showing up in a pair of flip-flops and two pairs of shorts won’t cover it.
We’ve got you covered with an in-depth guide to what you need to pack for Kilimanjaro here.
From tropical heat to frozen tundra, you will pass through different climate zones as you make your ascent. Being adequately prepared is essential. You also have to keep in mind that your porter will carry your gear and his own.
For this reason, most operators require that you keep your kit to 30lb/15kg. Anything over and above this, you will need to carry in your daypack.
Fitness & Physical Preparation
Climbing Kilimanjaro several times over the years, we know that a lot of people have questions about Fitness preparation for a climb of this sort.
Whilst Kilimanjaro is described as “easy”, in comparison to other mountains of a similar size, this is because there is no technical skill required to reach the summit.
However, a long, often hard slog at altitude does require preparation, both physical and mental.
You do not have to be a world-class athlete to successfully climb Kilimanjaro, but a suitable level of strength and fitness is a good idea.
Fitness will not help with acclimatization, but it will help make your climb less arduous. A good level of fitness will give you the “fuel in the tank” for the last push to the summit, which is a long day over some difficult terrain.
Read more about fitness for Kilimanjaro and the trekking summits here, and a guide to uphill hiking preparation here.
Altitude & Acclimatization
Note: consult your healthcare professional before undertaking any hike or climb. Nothing in this article, or in any of the information it contains is designed to diagnose, treat, prevent or cure any condition. Please consult your healthcare professional before making any changes to your current lifestyle.
Standing at 19,340ft above sea level, Kilimanjaro is Africa’s highest peak and the highest free-standing mountain in the world. Actually comprising three volcanic cones: Kibo, Mawenzi, and Shira, Kilimanjaro is a dormant volcano.
Anyone trekking to the Ash Pit (Reusch Crater), can smell the sulphur. The heat prevents ice from forming and occasionally fumaroles escape. It is possible to visit the Ash Pit, usually after a daytime summit attempt and a night spent in the Crater.
Trekking at altitude brings with it a unique set of challenges. Acclimatization is unique to each individual and fitness level has nothing to do with it.
The term “acclimatization” refers to the physiological changes that the body needs to go through to adapt to a low-oxygen environment.
Typically at sea level, the air we breathe consists of 20-21% Oxygen. The air at the summit of Kilimanjaro contains the same amount.
What changes is the Barometric pressure ” Air pressure ” meaning that as the pressure of the air goes down as we climb higher, the available oxygen to breathe in becomes gradually less. At the summit of Kilimanjaro, there is approximately 49% less oxygen available in each breath we take than at sea level(2).
Oxygen fuels all our bodily processes. With a decrease in air pressure, and resultant decrease in Oxygen, combined with dehydration and cold, getting ill at altitude is a very real problem.
Acclimatization is a progressive process, that allows time for the body to adapt to the changes. For this reason, a longer trekking route is the safest and most successful option.
For the geeks amongst us, it can be fascinating to see the physiological changes taking place as the body adapts to the high altitude.
The main reason why so many people fail to reach the summit of Kilimanjaro is being insufficiently acclimatized to the Kilimanjaro altitude. Standing at 19,341ft above sea level, Kilimanjaro’s summit falls into the “extreme altitude” category.
Owing to the lack of technical skill necessary to reach the summit, Kilimanjaro has become popular with inexperienced climbers. Coupled with cheap, fly-by-night operators and short treks this can be a deadly combination.
The main point to note is that in order to acclimatize, your body needs TIME. Otherwise, you will get sick and have to turn back forfeiting your summit attempt. Or, even worse, you need to be evacuated to the hospital.
There is a good reason why the longer routes on climbing Kilimanjaro have a better success rate. They build in enough time for you to rest and acclimatize, giving you the best chance of reaching the summit safely. And without having to suffer the horrible effects of altitude sickness.
People who have a high tolerance for discomfort can be at risk because they push themselves even when they don’t feel well. Of course, a slight headache at altitude can be quite normal.
A result of dehydration, perhaps. You don’t need to be paranoid about it, but you do need to recognize it. And feel comfortable that the guide you are climbing with is keeping a watch on the whole team.
The drug, Diamox, is often recommended by operators, as it can help with acclimatization. The major advantage of using Diamox is that it won’t mask the symptoms of AMS. If you are ascending too rapidly, you’ll still get sick. But Diamox can assist the acclimatization process. It’s a matter of choice whether you decide to take it.
Effects of Kilimanjaro Altitude
Kilimanjaro’s slopes span three altitude categories:
- High Altitude 1500 – 3500m, 5000 – 11,500ft
- Very High Altitude 3500 – 5500m, 11,500 – 18,000ft
- Extreme Altitude 5500m, 18,000ft and above
As we get higher up, the barometric pressure of the air around us decreases. The oxygen contained in the air is the same as at sea level (20.9%). Owing to the decreased air pressure, for any volume of air, there are fewer molecules of oxygen present. So with every breath, you inhale fewer oxygen molecules than at sea level.
At the summit of Kilimanjaro, there is 49% less oxygen available than at sea level.
Typically, the blood’s oxygen saturation ranges between 95-99%, which is known as SpO2 (Saturation point – Oxygen). A pulse oximeter, the device commonly used in hospitals and clipped onto your finger, measures this. As you ascend to higher altitudes, the decreasing availability of oxygen causes a reduction in your SpO2 levels. At the summit, it can drop as low as 70%, which would be considered an emergency at sea level.
In a professional tone, the text can be improved as follows:
“Your body dislikes reduced oxygen saturation, prompting it to initiate various mechanisms to increase it. These compensatory changes, known as “acclimatization” (or “acclimation”), are the body’s way of adapting to the hypoxic environment.”
Acclimatization
Some of the main compensatory changes are as follows:
These you may notice from the first day:
- Deeper, more rapid breathing.
- Increased pulse rate, even at rest.
- Increased blood pressure.
These go on behind the scenes if your body is given enough time to make the necessary physiological changes (1):
- Increased production of hemoglobin (where oxygen is carried in the blood cell).
- Increased erythropoietin (a hormone secreted by the kidneys to increase red blood cell production).
- Reduction of plasma volume making blood “thicker” and increasing the risk of dehydration.
- Increased kidney function to excrete excess bicarbonate ions as a result of pH (acid/alkali balance) of the blood changing.
These changes cannot happen overnight. Your body needs time.
This is why the best summit success rates are had on the longer routes. More importantly than a successful summit, taking a longer route decreases your chances of Acute Mountain Sickness.
Quite simply, the longer it takes to get to the top, the more time your body has to make the changes necessary to operate optimally in extreme altitude conditions.
Altitude Sickness – Acute Mountain Sickness – can kill you. Most of the deaths on Kilimanjaro are from complications arising from altitude sickness. Continuing higher when your body has failed to adapt to a lower elevation is nothing short of suicidal.
Some people seem to acclimatize very well. It has nothing to do with fitness levels, gender or age. Apart from taking Diamox – which is not a “magic bullet” – to aid acclimatization, there is nothing you can do to speed up the process.
In my opinion, it is important for everyone who attempts Kilimanjaro to do so with an operator who monitors their condition closely. Check your SpO2 (blood oxygen saturation), and your lung sounds (to identify problems early), and use a checklist of how you feel. This should be done once a day at least.
Acute Mountain Sickness
Acute Mountain Sickness is the result of climbing to a higher altitude quicker than your body can adapt to it. Symptoms can start from around 8,000ft in some people, and in others at around 11,000 ft.
Symptoms of AMS (2)
Mild Acute Mountain Sickness:
Symptoms of mild altitude sickness can be like a hangover.
- Lethargy
- Nausea
- Mild headache
- Slight loss of appetite
- Mild dizziness
- Mild cough
If you have no abnormal lung sounds and a good blood oxygen saturation level (SpO2), mild symptoms will likely improve after resting for a few hours. It is important to communicate with your guides and keep them updated on how you feel. Do not ascend to higher altitudes if you still have symptoms. Provided you have no abnormal lung sounds and a good blood oxygen saturation level (SpO2), mild symptoms should normalize after some hours of rest. Effective communication is essential. Make sure to keep your guides informed about your feelings and refrain from escalating the situation until your symptoms have subsided.
Moderate AMS:
- Deterioration of all the above symptoms
- Headache worsening
- Nausea and vomiting
- Increased dizziness
- Shortness of breath
- Loss of appetite and inability to eat
- Very weak and lethargic
- Coughing
At this point, you should descend immediately to the elevation where you last felt “well”. Remaining at this lower altitude until your symptoms normalize, only then should you even consider going higher.
Continuing to climb higher with Moderate AMS not only puts you at risk of requiring evacuation from the mountain but also endangers your life.
Traveling with a reputable operator, you will not be allowed to get to this point. If you do, then get down that mountain as fast as you are able! Spending some time in a Gamow bag (Portable Altitude Chamber) can be effective in reducing symptoms before making the descent. Under no circumstances should you climb higher after using the Gamow bag.
Severe AMS:
If you somehow managed to ignore the symptoms of moderate AMS, and have deteriorated to the point where you have Severe AMS, then your only hope for your life is to descend as quickly as possible.
- Increased shortness of breath
- Decreased coordination (ataxia)
- Inability to walk
- Hallucination and inability to communicate properly
- Increased coughing and fluid in the lungs
If you are suffering from severe AMS, it’s very possible that you will not be able to walk down the mountain and an evacuation will be necessary. You probably won’t even know how ill you are.
This is where you rely on your guides and teammates. Keeping an eye on each other, noting if people have symptoms that they seem unaware of. Any reputable operator will have been monitoring your condition long before it gets to this point.
There are two devastating results of severe mountain sickness, HAPE and HACE.
High Altitude Pulmonary Edema (HAPE)
For many years, various reports of healthy young men dying after a few days at high altitude incorrectly diagnosed High Altitude Pulmonary Edema (HAPE) as “pneumonia.”
In most cases, some symptoms of Acute Mountain Sickness have preceded the onset of HAPE. Though in some cases it can appear without prior symptoms.
Pulmonary edema occurs when fluid accumulates in and around the lungs, hindering the absorption of oxygen and causing difficulty in breathing.
Symptoms of HAPE include:
- Productive cough, with blood or mucus
- Gurgling lung sounds
- Blue lips from lack of oxygen
- Extreme fatigue
- Tight chest, difficulty breathing
- Confusion, lack of coordination
If you are at altitude and have the feeling that you may have a chest infection, assume it is HAPE until proven otherwise.
The symptoms can worsen rapidly, leading to a drop in blood oxygen levels and depriving the brain of oxygen. This can trigger the onset of HACE. If oxygen is accessible, it should be administered immediately, and descent should be initiated without delay. Waiting to “see if he/she feels better” is highly likely to result in fatality.
Descent is the only option, which is further made difficult as exertion can exacerbate HAPE. The shortness of breath and lack of oxygen can make the person unable to walk. For this condition, an evacuation is essential. It is important to get off the mountain and get medical attention immediately.
High Altitude Cerebral Edema (HACE)
High Altitude Cerebral Edema(4), characterized by a crashing headache that will not go away is the result of a buildup of fluid on and around the brain. The onset can be rapid, and once again, immediate descent is essential.
Symptoms of HACE include:
- Confusion and disorientation
- Hallucinations
- Lack of coordination
- Inability to walk
- Irrational behavior (as though the person is drunk)
- Severe headache
- Coma
Because HACE affects the brain, the person suffering may not know how ill they really are. Treatment with oxygen and a Portable Altitude Chamber whilst preparations are made for immediate descent can help.
Nothing will treat the onset of HACE whilst remaining at altitude. The only option is to go down and seek medical attention immediately.
MOST, IF NOT ALL SYMPTOMS OF ALTITUDE SICKNESS ARE A RESULT OF ASCENDING TOO QUICKLY TO A HIGH ALTITUDE.(5)
Tips to Stay Safe & Comfortable:
- Opt for a longer route, the longer the better.
- Do not use cigarettes, sleeping pills, or alcohol on the mountain. If you have a headache and need to take a painkiller, tell your guide.
- Choose an operator with robust safety procedures, and well-trained guides who know how to monitor you and recognize the signs of developing altitude sickness
- Communicate with your guides and fellow teammates, do not “tough it out” if you are feeling unwell.
- Keep well hydrated, drinking 3-4 liters of water per day.
- Go slowly! This is not a race, and the slower you go, the more your body is able to acclimatize.
- For extra safety, choose an operator that carries oxygen canisters and a Portable Altitude Chamber.
- If your chosen operator does not carry a pulse oximeter, take one with you – and learn how to use it to monitor your blood oxygen levels.
- Consider using Diamox, as recommended by many operators.
Altitude and Pre-Existing Conditions
Most companies will require a medical form to be filled in prior to being accepted on a trek. This gives them the opportunity to review any current medical conditions you may have and refer you back to your doctor for final acceptance.
If you have any medical conditions, even if they are well-controlled, I recommend that you visit your doctor or healthcare professional to inquire about the safety of going to altitude.
A common one is asthma. Many people who have no current symptoms of asthma, but have suffered with it in the past can find it rears its head on the mountain. The combination of dry, cold, dusty air and lack of oxygen can cause attacks.
If you rely on any medications, you should be sure to check with your doctor before attempting the climb. Also, check for any interactions with your current medication if you decide to take Diamox.
Weather
We all want to know what the weather will be like, don’t we? First up, it’ll be cold. Very cold. On your first day hiking through the tropical forest, sweating it out, you’ll be forgiven for cursing me. By day 2-3, you’ll be happy you heeded the advice to buy that nice warm sleeping bag!
One thing that can make a trek pretty miserable is a lot of rain. You can pretty much guarantee you’ll get at least some rain on the trail, though mostly in the lower elevations.
Being a mountain, and a big one, Kilimanjaro has its own micro-climate. The best times to climb are usually January to March and June to October as there is usually the least rain during these times.
However, it is possible to climb at other times of the year but April, May, and November have the most rainfall.
It should be noted that the June to October climbing season is often the busiest, and the January to March season is the coldest. There is a good chance if you are climbing in January that you will have snow on your summit day/night!
What to Expect
What’s the food like? What’s it like sleeping in a tent? What does an average day comprise? How much walking do I actually do each day? Where do I go to the bathroom?
Questions or Comments? Post them below. For any medical issues, please seek advice from your Doctor or other healthcare professional.
Recommended read:
Tongariro Alpine Crossing: New Zealand’s Best Day Hike
Insider’s Guide to Hiking Machu Picchu
Conclusion
Alright, friends, wrapping up our chat on climbing Kilimanjaro, it’s clear that this trek is more than just a hike; it’s a journey of a lifetime. With its breathtaking views, unique wildlife, and the thrill of conquering one of the world’s highest peaks, Kilimanjaro offers an unparalleled adventure.
Remember, it’s not just about reaching the summit; it’s about enjoying every step, every view, and every moment of this incredible experience. Pack your determination, respect the mountain, and embrace the journey.
Whether you’re a seasoned hiker or a first-timer, climbing Kilimanjaro is an unforgettable adventure that tests your limits and rewards you with memories that last forever. So, lace up those boots, gear up, and let’s make some epic stories!
Frequently Asked Questions
Planning your Kilimanjaro adventure starts with timing. The best times to climb are during the dry seasons – January to March and June to October. These months offer clearer skies and more stable weather, making your hike a bit more predictable and enjoyable. Just remember, even in the dry season, Kilimanjaro can throw some curveballs, so pack for all conditions!
Climbing Kilimanjaro is no walk in the park, but don’t let that scare you. A bit of prep goes a long way. Focus on cardio, leg strength, and endurance training. Also, practice some long-distance hiking with a pack. It’s not just about muscle; it’s about getting your body used to the long trekking days. And hey, don’t forget to have fun with your training!
Packing right is key to a successful climb. Layer up with moisture-wicking and thermal clothing to handle the varying temperatures. Don’t skimp on a good sleeping bag and pad – your rest is crucial. And of course, sturdy hiking boots are a must. Also, pack essentials like a headlamp, sunscreen, and sunglasses, and consider altitude sickness meds just in case. Travel light but smart!
Need More Advice on Gear and Footwear?
Here are some links to our most popular articles:
- Black Hills South Dakota- Camping in the Rain
- Trekking Everest Base Camp- Ultimate Guide
- How to Find a Campground- Tips from Longtime Campers
- What to Wear in a Sleeping Bag to Stay Warm
- Best Backpacks with Hydration Bladder
- Top Cheapest Camping Trailers for under $10,000
- Choosing Hiking Pants For Curvy Figures – The Ultimate Guide
- 11 Best Hiking Sandals Men- Step Up Your Hiking Game!
- Best Hammock Tarp (Rainfly): How to Choose and Use
- Top 12 Great Hiking Gadgets Every Hiker Needs This Year


Trackbacks/Pingbacks